Pluggable ASP.NET MVC application project structure
Developing loosely coupled modular programs is a good idea because it eliminates the risk of recompilation. This way of development strategy lets you to create modules and deploy it without recompiling the entire project. You will have a main project and multiple modules on top of that. something similar to wordpress core and wordpress plugins does. Here i am explaining, how to develop a pluggable ASP.NET MVC application project structure.
Step 1
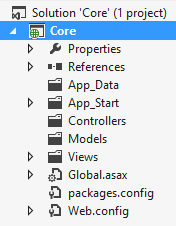
Create a new ASP.NET MVC Project. This will be our core project and we will be adding different modules to this as needed. You will see a project structure like this in your solution explorer. Since i opted for the "Empty" project template, the controllers folder is empty.
Step 2
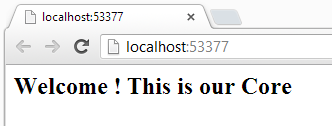
Now let's create a controller and it's views to this project. I will add a "Home" controller and it's "index" action and it's view. I added some text to the index.cshtml file and when i run the project, we can see the output like this.
Step 3
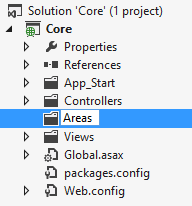
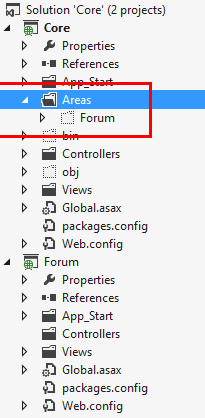
Our next step is to create a folder for our modules. All of our modules are going to be an area on top of our main(Core) projecct. So we will create a folder called "Areas" in the Core Project. I have also deleted the "Models" folder and "App_data" folder because we are not using that now.
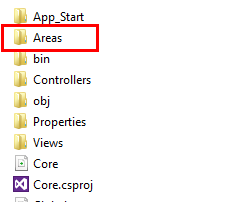
Now if you check the physical location of our Core project, you will see the Areas folder there. We will be using this as the location for our modules.
Step 4
Now we will add our first module. Right click on the solution explorer and select Add->New Project from the context menu. You will see the "Add New Project" dialog. Select "ASP.NET MVC4 Web application". Specify the project name and select the project location same as the path to our Areas folder.
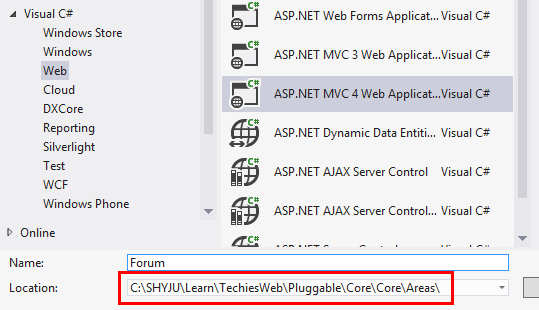
This will add the new project to our solution and it will be saved in the "Areas" folder of the main project. If you select the "Areas" folder in the main project and enable the "Show all files" option, you can see that our new project (Forum) is available under the Areas folder.
Step 6
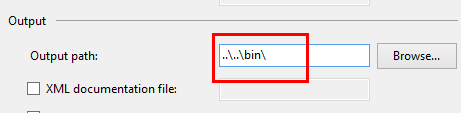
Our next step is to change the assembly output path location of our module project. Select the Forum project, right click and select properties from the context menu. Go to Build tab. You will see a section called "Output". There is a property called "Output path" Where you can define where the assemblies of this project should go when we build the project. By default the value will be bin\\ . Change the value to ..\\..\\bin\\ so that it will drop the compiled assemblies to the bin folder of our main project (Core).
Step 7
Now we will inherit the AreaRegistration class and override some items from that. So Let's add the below class to our module project.
public class ForumAreaRegistration : AreaRegistration
{
    public override string AreaName
    {
        get { return "Forum";  }
    }
    public override void RegisterArea(AreaRegistrationContext context)
    {
        context.MapRoute(
            "forum_default",
            "Forum/{controller}/{action}/{id}",
            new { action = "Index", id = UrlParameter.Optional },
            namespaces: new string[] { "Forum.Controllers" }
        );
    }
}
I will add this class to the App_Start folder of the Forum Project. You can see that we overrode the AreaName property and RegisterArea method in this class. We have provided the area specific routing ( in this case Forum) in the RegisterArea method.
You need to update the RegisterRoutes method of Core project to include the namespace while defining routes. This is to avoid the conflict between the controllers with same name which exists in both the projects. So your route defenition (of core project) will looks like this
public static void RegisterRoutes(RouteCollection routes)
{
    routes.IgnoreRoute("{resource}.axd/{*pathInfo}");

    routes.MapRoute(
        name: "Default",
        url: "{controller}/{action}/{id}",
        defaults: new { controller = "Home", action = "Index", id = UrlParameter.Optional },
        namespaces: new string[] { "Core.Controllers" }
    );
}
Now build your Forum project and then run the main project. You may access the pages from core project and the module and see what it brings.
 Page of Core project[/caption]
 Page from module[/caption]
The advantage of this pluggable architecture is, you can make some changes to one of your module and simply drop the assembly for that (and related view files if necessary) to the bin folder of the main project.
The sample project i created for this blog post is available here for download. Enjoy. Do not forget to say “Hi” to me, if this post was useful to you.